الجمعة، 7 ديسمبر 2012

Ancient Egyptian architecture


Ancient Egyptian architecture   is the architecture of ancient Egypt, one of the most influential civilizations throughout history, which developed a vast array of diverse structures and great architectural monuments along the Nile, among the largest and most famous of which are the Great Pyramid of Giza and the Great Sphinx of Giza.

File:S F-E-CAMERON EGYPT 2006 FEB 00289.JPG
The well preserved Temple of Horus at Edfu is an example of Egyptian architecture and architectural sculpture.

Characteristics
Due to the scarcity of wood, the two predominant building materials used in ancient Egypt were sun-baked mud brickand stone, mainly limestone, but also sandstone and granite in considerable quantities. From the Old Kingdomonward, stone was generally reserved for tombs and temples, while bricks were used even for royal palaces, fortresses, the walls of temple precincts and towns, and for subsidiary buildings in temple complexes. The core of the pyramids came from stone quarried in the area already while the limestone, now eroded away, that was used to face the pyramids came from the other side of the Nile River and had to be quarried, ferried across, and cut during the dry season before they could be pulled into place on the pyramid.
File:Lepsius-Projekt tw 1-2-108.jpg
Drawings of the types of the architectural capitals specific for the Ancient Egyptian civilization.

Ancient Egyptian houses were made out of mud collected from the Nile river. It was placed in molds and left to dry in the hot sun to harden for use in construction.
Many Egyptian towns have disappeared because they were situated near the cultivated area of the Nile Valley and were flooded as the river bed slowly rose during the millennia, or the mud bricks of which they were built were used by peasants as fertilizer. Others are inaccessible, new buildings having been erected on ancient ones. Fortunately, the dry, hot climate of Egypt preserved some mud brick structures. Examples include the village Deir al-Madinah, the Middle Kingdom town at Kahun, and the fortresses at Buhen and Mirgissa. Also, many temples and tombs have survived because they were built on high ground unaffected by the Nile flood and were constructed of stone.
Thus, our understanding of ancient Egyptian architecture is based mainly on religious monuments, massive structures characterized by thick, sloping walls with few openings, possibly echoing a method of construction used to obtain stability in mud walls. In a similar manner, the incised and flatly modeled surface adornment of the stone buildings may have derived from mud wall ornamentation. Although the use of the arch was developed during the fourth dynasty, all monumental buildings are post and lintel constructions, with flat roofs constructed of huge stone blocks supported by the external walls and the closely spaced columns.
Exterior and interior walls, as well as the columns and piers, were covered with hieroglyphic and pictorial frescoes and carvings painted in brilliant colors. Many motifs of Egyptian ornamentation are symbolic, such as the scarab, or sacred beetle, the solar disk, and the vulture. Other common motifs include palm leaves, the papyrus plant, and the buds and flowers of the lotus.Hieroglyphs were inscribed for decorative purposes as well as to record historic events or spells. In addition, these pictorial frescoes and carvings allow us to understand how the Ancient Egyptians lived, statuses, wars that were fought and their beliefs. This was especially true when exploring the tombs of Ancient Egyptian officials in recent years.
Ancient Egyptian temples were aligned with astronomically significant events, such as solstices and equinoxes, requiring precise measurements at the moment of the particular event. Measurements at the most significant temples may have been ceremonially undertaken by the Pharaoh himself.

The Giza pyramid complex
The Giza Necropolis stands on the Giza Plateau, on the outskirts of CairoEgypt. This complex of ancient monuments is located some 8 kilometres (5 mi) inland into the desert from the old town of Giza on the Nile, some 20 kilometers (12 mi) southwest of Cairo city center. This Ancient Egyptian necropolis consists of the Pyramid of Khufu (also known as the Great Pyramid and the Pyramid of Cheops), the somewhat smaller Pyramid of Khafre (or Kephren/Chefren), and the relatively modest-sized Pyramid of Menkaure (or Mykerinus/Mycerinus), along with a number of smaller satellite edifices, known as "queens" pyramids, and the Great Sphinx.

File:All Gizah Pyramids.jpg
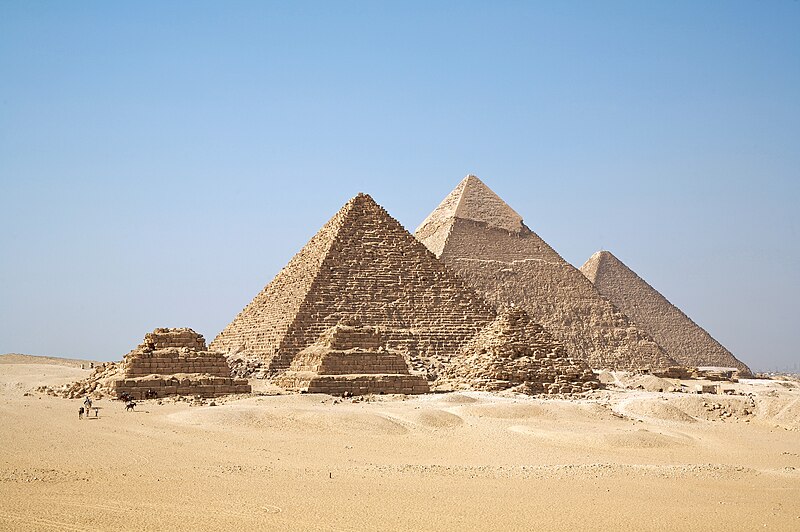
The Pyramids of Giza

The pyramids, which were built in the Fourth Dynasty, testify to the power of the pharaonic religion and state. They were built to serve both as grave sites and also as a way to make their names last forever. The size and simple design show the high skill level of Egyptian design and engineering on a large scale. The Great Pyramid of Giza, which was probably completed c. 2580 BC, is the oldest and largest of the pyramids, and is the only surviving monument of the Seven Wonders of the Ancient World.
 The pyramid of Khafre is believed to have been completed around 2532 BC, at the end of Khafre's reign. 
Khafre ambitiously placed his pyramid next to his fathers. It is not as tall as his father's pyramid but he was able to give it the impression of appearing taller by building it on a site with a foundation 33 feet higher than his father's. Along with building his pyramid, Chefren commissioned the building of the giant Sphinx as guardian over his tomb. The face of a human, possibly a depiction of the pharaoh, on a lion's body was seen as a symbol of divinity among the Greeks fifteen hundred years later. The Great Sphinx is carved out of huge blocks of sandstone and stands about sixty-five feet tall. Menkaure's pyramid dates to circa 2490 BC and stands 213 feet high making it the smallest of the Great Pyramids.
Popular culture leads people to believe that Pyramids are highly confusing, with many tunnels within the pyramid to create confusion for grave robbers. This is not true. The shafts of pyramids are quite simple, mostly leading directly to the tomb. The immense size of the pyramids attracted robbers to the wealth that lay inside which caused the tombs to be robbed relatively soon after the tomb was sealed in some cases. However, there are sometimes additional tunnels, but these were used for the builders to understand how far they could dig the tomb into the crust of the Earth. Also, it is popular thought that due to grave robbers, future Kings were buried in the Valley of the Kings to help keep them hidden. 
This is also false, as the Pyramid construction continued for many Dynasties, just on a smaller scale. Finally, the pyramid construction was stopped due to economic factors, not theft.
It is widely believed that the pyramids were able to be constructed due to slave labor. Some scholars believe that they were essentially built by farmers during the off season. Either way, the pyramids represent a lifestyle of the nobles that could not exist without the presence of slave labor.

Karnak
The temple complex of Karnak is located on the banks of the River Nile some 2.5 kilometers (1.5 mi) north ofLuxor. It consists of four main parts, the Precinct of Amon-Re, the Precinct of Montu, the Precinct of Mut and theTemple of Amenhotep IV (dismantled), as well as a few smaller temples and sanctuaries located outside the enclosing walls of the four main parts, and several avenues of ram-headed sphinxes connecting the Precinct of Mut, the Precinct of Amon-Re and Luxor Temple.

File:Hypostyle hall, Karnak temple.jpg
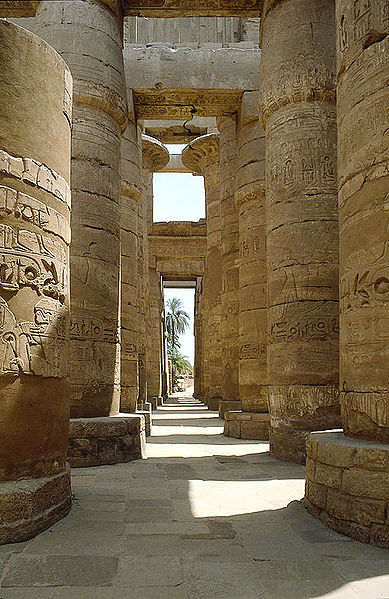
The hypostyle hall of Karnak Temple

The key difference between Karnak and most of the other temples and sites in Egypt is the length of time over which it was developed and used. Construction work began in the 16th century BC. Approximately 30 pharaohs contributed to the buildings, enabling it to reach a size, complexity and diversity not seen elsewhere. Few of the individual features of Karnak are unique, but the size and number of features is overwhelming.

Luxor Temple
The Luxor Temple is a huge ancient Egyptian temple complex located on the east bank of the River Nile in the city today known as Luxor (ancientThebes). Construction work on the temple began during the reign ofAmenhotep III in the 14th century BC. Horemheb and Tutankhamun added columns, statues, and friezes – and Akhenaten had earlier obliterated his father's cartouches and installed a shrine to the Aten – but the only major expansion effort took place under Ramesses II some 100 years after the first stones were put in place. Luxor is thus unique among the main Egyptian temple complexes in having only two pharaohs leave their mark on its architectural structure.

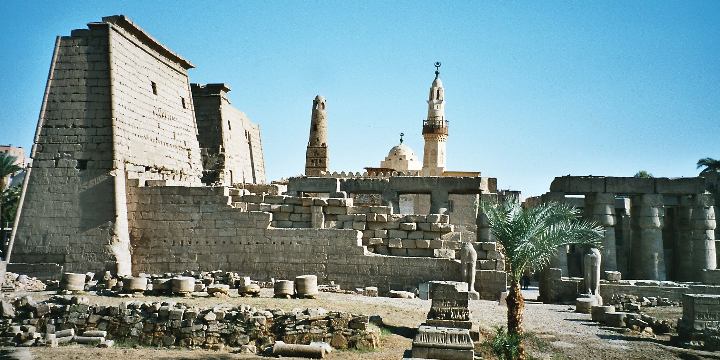
Luxor Temple, from the east bank of the Nile

The temple proper begins with the 24 metre (79 ft) high First Pylon, built by Ramesses II. The pylon was decorated with scenes of Ramesses's military triumphs (particularly the Battle of Qadesh); later pharaohs, particularly those of the Nubian and Ethiopian dynasties, also recorded their victories there. This main entrance to the temple complex was originally flanked by six colossal statues of Ramesses – four seated, and two standing – but only two (both seated) have survived. 
Modern visitors can also see a 25 metre (82 ft) tall pink granite obelisk: this one of a matching pair until 1835, when the other one was taken to Paris where it now stands in the centre of the Place de la Concorde.
Through the pylon gateway leads into a peristyle courtyard, also built by Ramesses II. This area, and the pylon, were built at an oblique angle to the rest of the temple, presumably to accommodate the three pre-existing barque shrines located in the northwest corner. After the peristyle courtyard comes the processional colonnade built by Amenhotep III – a 100 metre (328 ft) corridor lined by 14 papyrus-capital columns. Friezes on the wall describe the stages in the Opet Festival, from sacrifices at Karnak at the top left, through Amun's arrival at Luxor at the end of that wall, and concluding with his return on the opposite side. The decorations were put in place by Tutankhamun: the boy pharaoh is depicted, but his names have been replaced with those of Horemheb.
Beyond the colonnade is a peristyle courtyard, which also dates back to Amenhotep's original construction. The best preserved columns are on the eastern side, where some traces of original colour can be seen. The southern side of this courtyard is made up of a 36-column hypostyle court that leads into the inner sanctums of the temple, which begin with a dark chamber not achechamber.

Please notice that i`m trying to compress the amount of words written and be more general, for more articles about ANCIENT EGYPTIAN ARCHITECTURE please see the rest of articles under the same title and wait for another articles I am writing.

الخميس، 6 ديسمبر 2012

Wall decoration tips

Make brilliant Effects by your self


1- Sponging effects

When you look at this effect it should remind you with scattered drops of water on the surface, it gives you vibrant energy and warm live feel. And it's one of the easiest effects to apply.You can use many colors of glaze. 


The tools:

               Natural Sea Sponge                        Application roller 


Choosing your hue:
For quiet view choose the matching colors with furniture, curtain to focus on, or can you choose a different colors to achieve the strong effects.

A few ideas: By varying the pressure you can get a stronger and different effects.
If something goes wrong you can always sponge on the basecoat color to balance the final effect.

To get a stronger effect try to use two layers with same sponge color or use different colors with light color to dark.


2- Colorwash effect

It's like the desert that has been disturbed by the wind. It's as random as the infant's first scribbles. For a good idea of the effect, imagine haystacks, Sparrow's Nest and the wind clutters. 

This effect appears different and contrasting colors with even using one color glaze by moving sponge randomly it give a wonderful degree.


The tool: 
               Colourwash Sponge                  Application rolle


Choosing your hue: The colour range offered is saturated and pure. It has glowing colours and mystic hues. For a truly dramatic play of colours, mix two shades of the topcoat and create a magical moment.


A few ideas: To create a softer look, use colors from the Sponging palette. for a rich and dramatic effect, use color combinations from the Brushing Palette. 

Use colors from the Ragging Palette for a more vibrant effect. Try colorwahing several layers of the same color for a more intense effect.


3- Combing effect


Combing is a fun technique that creates a striated effect with paint. Vertical lines that mimic the sheen of opulent silk. Create waves, curves, horizontal stripes or weaves for a striking impression.
Combing allows you to transform virtually any smooth surface into delightfully textured & stylized veneer.


The tool: 

      Special Effects Comb or any sharp brush                  Application rolle                                     


Choosing your hue: This is a complex colour combination palette. We have used unexpected contrasts that are most suitable for this palette only.

A few ideas:: Work with stroke size you are comfortable with. Too much pattern may make this look busy. In the room where you use this texture, enhance its effect by using natural materials. Use cane furniture, handloom weaves or terracotta.


4- Ragging effect

Ragging is a faux finish technique used to create subtle or dramatic effects allowing you to create a fabric-like finish that changes the appearance of your entire room. The muted colour palette exudes a rich and hand worked feel.
Experimentation is the operative word when you want to rag. The Ragging effect in bolder colours can be casual and fun. The effect provides an almost surreal experience when set against minimalist, modern furniture or an abstract painting.


The tool: 

Ragging Roller 
(you can bye it from the store or easily fix some painting papers on a rolle)                                                                               

                                                                            
                                            Application rolle


Choosing your hue: The colours offered in Ragging are bolder, but still harmonious for tone on tone.

A few ideas: Traditional ragging calls for a topcoat colour that's few tones darker than the basecoat colour. To get a softer ragging effect, use the colour combinations from the Sponging Palette. For an eartier look use the colour combinations from the Spatula Palette.


5- Moire effect

Also called Graining, this effect gives the look of the old Moiré material and forms a pattern like the Moiré on Walls. The technique needs some skill and practice in application using the special graining tool. This is a glaze-off technique and requires faster working by paying extra care when doing over large surfaces to get an even pattern of the Moiré effect.
Combing allows you to transform virtually any smooth surface into delightfully textured & stylized veneer.

It looks a bit difficult but the result will surprise you.


The tool: 

                     Graining Tool                                     Application rolle              


Preparing the base coat: First, apply the base coat colour from Acrycoat Silk or Eggshell Emulsion like normal emulsion finish with a roller and let it completely dry.

step 1 Wood 1: Get another person to help. As one person applies a roller width of glaze, the other should drag the graining tool from top to bottom with even pressure up and down wrist movement to create the pattern.

Step 2 Wood 2: Plan to complete the entire length in one stretch without stopping end to end, move the graining tool again vertically from top to bottom by constantly dragging it down and at the same time rolling the tool up and down to create the pattern. Keep wiping the glaze being removed every foot with a clean cloth to get a sharp pattern. For large surfaces it is recommended that one person applies the base coat while the other grains the glaze (Moiré Effect).

Creative Tips: Use this effect in thin strips over manageable lengths that can be completed in one stretch of application. Alternate strips can be in complementing or contrasting colours.


الأحد، 2 ديسمبر 2012

Bathroom Ideas – Planning and Design Ideas


Find out about bathroom design and decoration, the different design styles of bathrooms and some interior designer critiques on designer bathrooms, this always gets you thinking and helps improve your interior design skills.
Bathrooms are no longer the small washroom squeezed into a back corner of the house on the cold side of the home, where you can pivot on one foot and reach everything.
Bathroom Ideas - Bed Bath and Beyond with this Luxury Grecian Themed Bathroom
Bed bath and beyond. with this Luxury Grecian Themed Bathroom.
The modern bathroom has evolved into a place of design serenity. A place to linger and enjoy the surroundings, a bathroom now accommodates our every need and pampers us with pulsating shower heads and jets, heated towel rails for snuggly warm dry towels, under floor heating, demister mirrors and probably soon espresso machines. No seriously, they are now a place of indulgence.
In todays’ busy world we need time to recharge and what better way to do this than soaking in a hot bubble bath, or having a steaming hot shower to clear your head.
Lets face it, there are a lot of do’s and dont’s for bathroom and ensuite design and it important to get as much knowledge possible to design the most ergonomic and user friendly space possible. I know as a designer that I have made a mistake in our design. We have a pedestal basin, and it is very high, my children can’t wash their hands in it and I need a stool in front of it which is great for them, but a hazard for the taller of us.  No stool equals mum lifting them to wash their hands……very tedious.

Think about who will use the space and accommodate the heights of the fittings and fixtures. This is not only for children, but the elderly or disabled who require a lower basin, easy access to the shower, hand rails. Lots to think about.


Ideas for Bathroom Design and decoration

We use the bathroom every day. That’s a good reason to have a well designed and decorated  space, because often we can have the whole family sharing the small bathroom space in the mornings, we need to work out how we can achieve a harmonious flow in this area.
We not only look at aesthetic considerations but also ergonomics and functionality. Learn about bathroom and ensuite design planning and renovation and find out what  fittings and fixtures you need. There are examples  to give you inspiration when you have your planning sorted.
Bathroom Styles, Critiques, Design & Decoration
See examples of  designer styles, get ideas for decoration, and learn how to critique a design to see if it works.
Bathroom Lighting and Electrical
Bathrooms today are very dependant on electricity as well as water. We show you some electrical fittings and items that you need to think about when you are planning a new home or renovating an existing space.
Bathroom Plumbing, Taps & Faucets
Have you ever wondered how the water gets to your tap or where it goes to once it leaves the basin or bath? We show you the basic principals of plumbing which isn’t as difficult as we have been lead to believe, it is actually very interesting. You won’t ever look at a WC pan the same again. Have you ever tried to purchase atap or faucet? Then been faced with hundreds of choices, we break the barriers down and make tap and faucet selection easier.
Bathroom design - marble walls and floor to this bathroom.
Bathroom Accessories
Accessories are the finishing touches that we always forget to budget for in our project planning. They may sound small but they add up quick, so learn what they are and specify them at the beginning of your bathroom project.
Bathroom Design - Historic Bathroom Makeover
Bathroom Makeovers
We have some ideas for bathroom renovating, the first one is a simple change of wall color – somewhat radical color choices but it shows how little you need to do sometimes to create a big change to the bathroom’s look and style. The second is an Historic Bathroom Makeover, it is simple and provides some good ideas for the use of materials and color in your bathroom makeover.
Bathroom Flooring, Vinyl, Tiles
We provide information on materials such as vinyl flooring – a great product for wet areas in the home, and tiles and stone products add luxury and create a clean and sophisticated look.
Bathroom Color, Paint & Wall Coverings
If you are renovating, using a decorative paint finish is an economical way to update the look or style  or even the simpler makeover using paint color provides a wonderful facelift for any tired looking bathroom or ensuite.
Bathroom Resources
Bathroom Curtains and Blinds
Bathroom Fittings and Fixtures
Bathroom Photographs
Bathroom design can be simple and functional or luxurious and ornate.
Bathrooms can be simple and functional or luxurious and ornate.

Kitchen Design, Planning, Advice and Ideas

The kitchen is said to be the heart and hub of the home or house. It is usually the first place we stop to sit down on one of the barstools when we enter the house, therefore it is crucial that we get our kitchen design to work for the family or occupants of the house.
It’s where we store our food and prepare our meals and often the kitchen is where we dine.
However its not just the food area of the house as its usually central to the traffic and living flow.
Preschoolers will play there while the parent is cleaning up and working with food, children will often do their homework there with the help of the parents while preparing an evening meal and if you have a party you can bet that’s where many of the partygoers will gravitate.
It’s an odd phenomenon but the kitchen is the heart of the home and that is why this website explores all the areas and needs of the kitchen, the design and decoration. All the activities and more are part of the kitchen’s role and the themes are endless from contemporary, modern to a traditional country kitchen.
Kitchen Design - Lovely detail in this tiled splash back.
The fantastic thing about modern kitchens is that they can look old or to any style and still be practical with the modern finishes and appliances available. Kitchen design is not a simple process but it is logical and using this website will enable you to answer many of the questions you have and how to design and plan a kitchen.

Kitchen Design Decorating and Remodeling Ideas

Get information on kitchen decorating and cabinetry design.

Kitchen design is a large topic, covering space planning, appliance selection, decoration with flooring, finishes, colors and hardware. You could be looking to design a new kichen and want ideas on different styles or you could be remodeling and looking to choose different finishes for your cabinetry. Whatever your position, there are ideas and inspiration for you here.
We know that the kitchen is the central hub of every home, even if you don’t cook in it, it still houses the refrigerator and we access that frequently. If you do cook, then you will be particular about where everything is stored and placed in your environment. The kitchen makes up a large focus of interior design and is often one of the major areas of the house that people consider when looking at purchasing a new home because it is one area that costs a lot to alter.
Whether you want to remodel your existing space, design a new kitchen from scratch, gain skills for being a kitchen designer or you have a general interest in decorating and making your existing space work better then you will find articles of interest for you here.
The golden question is how do we go about putting a kitchen and the associated areas together, how do we make the choices from the hundreds of options available.

Planning a Kitchen Design

Planning a kitchen design, like all things that are built, if you get the foundation correct then the finishing items usually go into the main system fairly smoothly. So it follows that if you plan your kitchen correctly and methodically then the process should be relatively straight forward, however if you start with the finished idea then that may not be at all practical.
To plan a kitchen we need to start with establishing the parameters within which we have to work. This includes the actual space, the uses of that space and the budget.

There are four stages to planning a kitchen:

  1. Defining the space, which includes either measuring up, and noting the position of the existing services, windows and doors of planning from the start with the architect on how you want the space laid out.
  2. Designing the room’s layout to get the appliances, work tops and cupboards where you want them.
  3. Confirming that layout and the services that are needed.(This includes lighting).
  4. Confirming the finishes that you require for the bench tops, the exterior of the cabinetry and the interior of the cabinetry, the flooring, the walls, ceiling and window treatments
The following is intended to help you with the actual kitchen planning, but they are only suggestions and will not be practical in all situations, you will often have to compromise. The golden rule is – keep it simple – and remember that the kitchen is one of the main selling points for a house.
For years now kitchen designers have used a simplistic method of a triangle to connect the three main work spaces within a kitchen.
The main working zones in the kitchen are generally recognized as being – food preparation, cooking and serving, and finally washing up. Each activity zone needs to include the work top(s) and appliances required for that activity, also the zone will require the storage space for the utensils, ingredients etc. required for it.
In addition to the three zones, it is important to arrange the appliances and work tops in the correct order i.e. work top – appliance – work top. A work triangle is formed between the three zones 
For the greatest efficiency the total length of the three sides of the triangle should be between 3600mm and 6600mm, and as far as possible, the work triangle should be uninterrupted by through traffic.

Kitchen Styles - Which One Suits You?

Kitchen styles – sleek and industrial, rustic and homely, crisp and fresh, which one suits you?
There is an expression for all the differing kitchen styles available, but they all have one thing in common.
They all have a sink, oven and refrigerator!
Most have many more appliances and this makes the kitchen the most expensive room in the home to equip.
So careful planning and attention to detail for every aspect is essential from electrical power point placement to light fittings; the kitchen is a complex space to design.
The kitchen is the hub of the home as we all have to eat regularly and it is always a constant buzz of activity. Kitchens are therefore one of the major area home buyers look at along with bathrooms when purchasing a house.
There is a kitchen style out there to suit every home!
The first consideration whether remodeling your existing house or starting out with a new home is the current style of your home and your furnishings. The kitchen is often placed centrally in the home and therefore visible from most rooms, the decoration and style should flow harmoniously throughout.
Imagine how crazy a sleek single line, white marble top, lacquered cabinetry with stainless steel appliances would look in a country cottage. An exaggeration of concept but crazier style combinations have been seen, unfortunately most of them fail as the contrast is too great and the detail of the styles is broken and lost with the jolting differences in a small space.
In this area of the website we outline the features of different kitchen styles and allow you to decide which style reflects your home and your lifestyle best.

Kitchen Styles

Traditional Styled Kitchens – Timeless and versatile.
A simple country kitchen with the plentiful use of timber or wood.
Country Styled Kitchens – Relaxed and Comfortable.


Contemporary Style Kitchen - Stainless steel appliances and white cabinetry provide an ideal backdrop for adding a splach of bright color to the kitchen.
Contemporary Styled Kitchens – Sleek and Streamlined.

So follow through and find out which style of kitchen fits the look of your home.
To learn about which type of kitchen layout best suits you visit Kitchen layouts.
Remember that there is a style of kitchen out there for everyone, when you add your decoration to the space you completely create your own unique sub style of kitchen design.

Kitchen Photos of Interior Design and Decoration

When it comes to choosing what type of kitchen design you want, the choice can be overwhelming. That is why looking at kitchen photos can help you rule out what you don’t like and start zeroing in on what you do.
You will find after looking through magazines and web sites, that a particular style or theme will start to prevail and it will give you a great starting point for working out what look you want for your kitchen.
Below are some kitchen photo examples with interior designer critiques of what they think works and doesn’t in the kitchen design. Please browse through and get ideas for your kitchen design or even just kitchen decoration, see how different finishes look combined together, how appliances are teamed up, lighting ideas and flooring combinations. There are lots of things to explore in a single kitchen photograph. See if you can find the one thing that makes the kitchen special, is it a functional item or simply decoration? Collect little ideas and collate them for putting together your kitchen.


Kitchen Photos of Interior Design and Decoration

kitchen photos of White timber country kitchenWhite Timber Country Kitchen
kitchen photo of Dark Timber or Wood and Stone KitchenDark Timber or Wood and Stone Kitchen
kitchen photo of Detailed Kitchen Cooking AreaDetailed Kitchen Cooking Area
kitchen photo of Upholstered Chair in Kitchen DesignUpholstered Chair in Kitchen Design
kitchen photo of French Castle Kitchen DesignFrench Castle Kitchen Design
kitchen photo of Timber Kitchen with Colored Glass Vases for DecorationTimber Kitchen with Colored Glass Vases for Decoration
kitchen photo of Chandelier over Kitchen IslandChandelier over Kitchen Island
kitchen photo of Kitchen Design ImprovementsKitchen Design Improvements
kitchen photo - Molded Timber Kitchen with Tile InlayMolded Timber Kitchen with Tile Inlay
kitchen photo - Modern Stainless Steel and Timber or Wood KitchenModern Stainless Steel and Timber or Wood Kitchen
kitchen photo - Sloping Ceiling KitchenSloping Ceiling Kitchen
kitchen photo - Textured Kitchen Design with Stone and Tiles Textured Kitchen Design with Stone and Tiles
kitchen photo - Traditional Paneled CabinetsTraditional Paneled Cabinets
Get inspired with the kitchen photos, look at all the detail and imagine yourself using the kitchen, then you will start to see what will work for you and what won’t.
Look at the size and placement of the sink, see what type of faucet or tapware they use with the different styles of sinks, see how they use extract fans and decide if you want them to be a feature of be hidden away.
Examine the lighting, this will make or break your kitchen.
Most of all, take your time, a kitchen is a very expensive room in the house to design or renovate and believe it or not, your taste will change the more kitchen photos you look at, so don’t jump in before you have done all your homework or you might regret it.


Home Office Renovating Tips


Coping with the Home Office When Renovating

 
royal home office
Working from home has many great advantages, being able to sleep in a few extra minutes, make yourself a snack when you’re hungry, have a nap in the sun for a coffee break, saves on fuel costs, hang out your washing on a sunny day, work in your trackies and trainers, but all these advantages can be lost and a great deal more disadvantages added when you decide to renovate your house and still have to work in your home office, so here are some home office renovating tips to help you cope with whats ahead.
As we have just gone through all this renovating ourselves and we work from home and had a new baby at the time, we have some tips on how to cope with living and working in your home when you have building contractors pulling your house and lifestyle apart.
Make life easier for your contractors by moving everything out of their way and store it in an enclosed space, preferably out of the building area. This way your precious possessions won’t get broken or covered in “building dust”. This dust seems to sneak into every little seam of the house.
Pack away most of your children’s toys. This doesn’t sound fair for the kids, but it is a lot easier than having crying children with their favorite toys damaged from leaving them under your builders feet! It is also a lot safer environment for them to work in if there aren’t obstacles for them to trip over.
Never plan to work while the contractors embark on major noisy jobs, ask them the night before what they will be doing the following day, this way you can sort out the best time for making phone calls and coordinate when to leave the house for lunch. Loud noise can build up and make you aggravated and very grumpy, especially if you are trying to concentrate.
An valuable item in your home is the flooring, this is often overlooked when renovations take place, so ensure you place protective coverings over your carpet or hard flooring. Even the most prudent workmen will still manage to drop things on the ground. Building dust can really scratch hardwood floors and get embedded into the carpet fibres and cause your carpet to wear prematurely, so make sure you keep it covered and taped down.
Take down the drapes and blinds from your windows, this way you can protect them as they are easily soiled or damaged by construction work and an expensive item to replace.
Remove your pictures and paintings from the walls.Contractors often travel blindly carry timber and plasterboard sheet through your home which can easily disrupt your posessions. Another subtle variation to this is the vibrations from a hammer on the neighbouring wall making the artwork fall from the wall.
Make an effort to vacuum the whole house every night. It sounds like a lot of work but it is well worth the time envolved. Work the area thoroughly around the construction site and quickly for the remaining areas of the house and this reduces any long term damage to your home and your health. Dust can engulf your entire house, by eliminating as much as you can on a daily basis, when the work is complete the dust will have less impact on your living areas. The dust remains in the air and will settle over a few months, so getting as much away as possible before it gets airborne is a positive step to reducing this problem.
Before the contractor starts work in your home inform them that your home is a family home including children and / or pets and they all have different needs that have to be considered. That prepares them for the environment that they will be working in and ensures that they are aware of leaving doors or gates open, and this then reduce the risk of you losing something precious.
Make sure you set yourself achievable work goals each day. Remember that there will be constant noise, which does upsets your concentration, the contractors will be asking questions and taking breaks and wanting to use your facilities. The mental stress of renovating will make you feel more tired and the house will feel in a constant state of disarray.
Achieve what you can while the contractors are working during the day and once they have left you can attempt some extra work at night to keep up your work load, remembering that this is only a temporary situation.
Don’t even think about setting up meetings with clients in your home office. You won’t be able to be professional with the renovations happening around you so make the most of it and book in your meeting at a local cafes.
Taking care of your contractors with a little sweetening up of tea, coffee and occasionally some cake or muffins is a good way of making them respect your home and the fact that you want them to feel welcome to stay and finish the job. Don’t get too engaged though as often like to sit around and chat, remember who is paying for that chat.
It is vitally important that you have an agreed date that the project needs to be completed by. This ensures that the work will get done as soon as possible, reducing the amount of disruption in your home and office. If not you could find your home office world upside down until the contractor decides he is ready to finish your job. This costs your sanity and money as you cannot fulfill your simple daily work tasks.
Create one “sane” place to go in your home through the renovating process. An untouched area in your home. This will be your escape space! When you feel you can’t cope with the mess any longer you can go to this place and regain some sanity.